In this guide we provide some cold email best practices and how to’s on getting started with cold email for driving SaaS demos. To be clear, this is specifically B2B outbound sales focused email from one company to another that has a likely “legitimate interest” (a GDPR compliant term) to hear from them.
For starters, it’s best practice to set up a separate domain for cold email outreach to protect the main domain. We use Namecheap, a cheap and easy to use registrar for domains and DNS and Google Workspace for email, although instructions should be similar for most tools.
Looking for a Cold Email Agency to Set this up and run on your behalf?
Consider an all-in-one data and sales outreach automation tool like Apollo.io and working with a certified Apollo.io agency partner like SaaSBoost.io to implement and manage a cold email outreach lead engine on your behalf. Or read on to set this up for yourself.
UPDATE: Easiest way to set up cold email infrastructure - done for you with Zapmail.ai
As of September 2025 updates in the market, it's easier than ever to get domains properly configured with SPF/DKIM/DMARC and connected to GTM tools.
After lots of testing in the market, we are currently recommending Zapmail as the best and easiest to use cold email infrastructure provider. Why?
- Ease of use - very simple to buy domains and mailboxes in one place (both Google and Microsoft). Buy domains here or bring your own.
- One click DKIM/DMARC/SPF setup
- Can still access the mailboxes direct, even with 2FA
- Fair pricing, starting at $3.90/mailbox/mo
- Integrations - the team will help export mailboxes to most popular GTM platforms like Smartlead, Instantly, Apollo.io, etc.
- Overall great UI and experience
Still want to do this yourself?
Steps to Buy and Setup a Domain for Cold Email Outreach (DIY)
- Buy a separate domain (i.e. "yourdomainmail.com", "tryyourdomain.com", etc.. Namecheap has .email domains for $5. Tips that should help with email deliverability when it comes to buying domains: 1. Use only ".com" (not ".io", ."email", etc.). 2. Avoid any numbers or dashes 3. Turn privacy "Off" - this will expose data in the WHOIS registry, but this is an indicator of legitimate business email
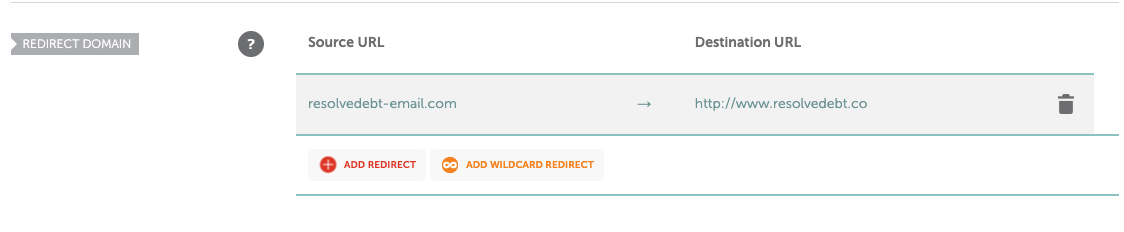
- Adjust DNS settings to redirect to your main site. Domains -> Advanced DNS -> Redirect Domain:
- Head over to Add Google Workspace - Business Starter ($6/user/mo) Consider paying 6 months in advance - this is another signal of legitimacy that has seemed to boost Sender Reputation.
- Go through the Google Workspace setup process to Protect the Domain, setup MX records email on Namecheap.
- Another TXT Record will be added in Namecheap Advanced DNS when verifying you own the domain through Google Workspace. It will look like this:

- Create one or two email addresses per domain if the main purpose is for cold email. Add Email Signatures.
- Warm up the email using an email warmup service to start improving Sender Reputation. We like Warmforge.ai - there is a 7 day free trial, and pricing starts at $12/mo per inbox. 2-3 weeks would usually be long enough to warm up an inbox in total (you can slowly start sending out emails after a week or so and ramp up volume from there).
- Depending on the number of domains you are using, it may make sense to forward all emails to one central inbox for easier management. In Gmail, navigate to Settings -> See All Settings -> Forwarding and POP/IMAP -> Add a Forwarding Address. Choose one central mailbox and repeat this step for all of the other email addresses that you don't want to log into.
There are also some steps we can take to improve “Sender Reputation”. The higher your Sender Reputation, the better the deliverability of your emails. Ready to start sending emails? Here are some tips for improving deliverability and response rates from cold email to drive SaaS demos and interest.
Best Practices for Cold Email Outreach - Improve Sender Reputation and Response Rates
- Personalized, relevant emails to recipients should improve engagement and response rates. This part is sales and marketing 101 - define your ICP (Ideal Customer Profile), hone your messaging, and use things like intent data signals to send the right message to the right people at the right time. More engagement = Better Sender Reputation.
- Build very targeted, accurate account lists - each email is an 'at bat'. An email to a relevant account has a good chance to get a response. An email to an irrelevant account will not only not get a response - it may get marked as spam. Even no reply is harmful and a bad signal to Google/MSFT. Building custom account scoring models is one way to prioritize the right accounts.
- Sends should be from an actual person (sales focused email = high inbox placement) vs. a company account (marketing focused email, = tends to get stuck in spam filters)
- Make sure your bounce rate is low (clean data = higher Sender Reputation)
- Limit to business hours and business emails
- Include your company's physical address
- Drip/space out sends every 5-10 mins vs. large batches
- Limit volume from each mailbox, particularly in the first few weeks, months
- Set up campaigns based on engagement behavior. If recipient has never opened an email, move them to an 'every other month' list. Servers look at the relationship between senders not just 'is the email address passable'.
- Maintain an opt-out or unsubscribe list and can synch that with a CRM. If you are doing something that causes your unsubscribe rate to increase, stop.
- If your organization is sending a large amount of opt-in transactional email, consider Email Deliverability Software like Sendgrid
- For further reading see Top 12 Cold Email Mistakes to Avoid for SaaS Outreach which also covers building lists, content strategy, marrying inbound and outbound for an "allbound" approach, etc.
DKIM Setup for Cold Email Outreach
Definitely set up DKIM (Domain Keys Authenticated Mail). From Apollo , DKIM is “an authentication method that uses cryptography to add an encrypted digital signature to your organization's outgoing emails. In this method, your mail server uses a private key to encrypt the email data and receiving email servers retrieve the corresponding public key to decrypt it. This ensures that your email is genuinely sent from your domain and hasn’t been altered on its way to the recipient. It also raises your spam score, which increases the chances of your emails being delivered.”
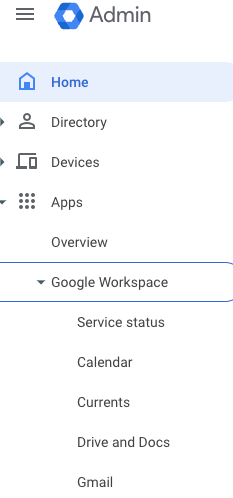
In Google Workspace, Go to Admin → Apps - > Gmail:
→Authenticate Email
→Generate New Record
→Go to Namecheap, Advanced DNS, Add TXT record. Copy and paste values and create a new TXT record like this:

→Back at Google - Click “Start Authentication” (might have to wait a minute or refresh, try this a few times)
→Check Status in Google:

When DKIM setup is complete and working correctly, the status at the top of the page changes to: Authenticating email with DKIM
How to Verify DKIM authentication is working:
- Send an email message to someone who is using Gmail or Google Workspace. (You can't verify DKIM is on by sending yourself a test message.)
- Open the message in the recipient's inbox and find the entire message header.Note: Steps to view the message header differ for different email applications. To show message headers in Gmail, next to Reply, click More Show original.
- In the message header, look for Authentication-Results. Receiving services use different formats for incoming message headers, however the DKIM results should say something like DKIM=pass or DKIM=OK.
If the message header doesn't include a line about DKIM, messages sent from your domain aren't signed with DKIM.
Should look like this:

Set up an SPF Record for Cold Email Outreach
If you are using just Google Workspace for sending emails, this simple SPF record will work:
v=spf1 include:_spf.google.com ~all
->Add this as a TXT Record in Advanced DNS settings at Namecheap:

Setting up DMARC Records
Allow 48 hours after setting up SPF and DKIM before setting up DMARC. A very basic DMARC record looks like this:
_dmarc TXT v=DMARC1;p=none;sp=quarantine;pct=100;rua=mailto:dmarcreports@example.com-> Add this as a TXT record back in Namecheap Advanced DNS
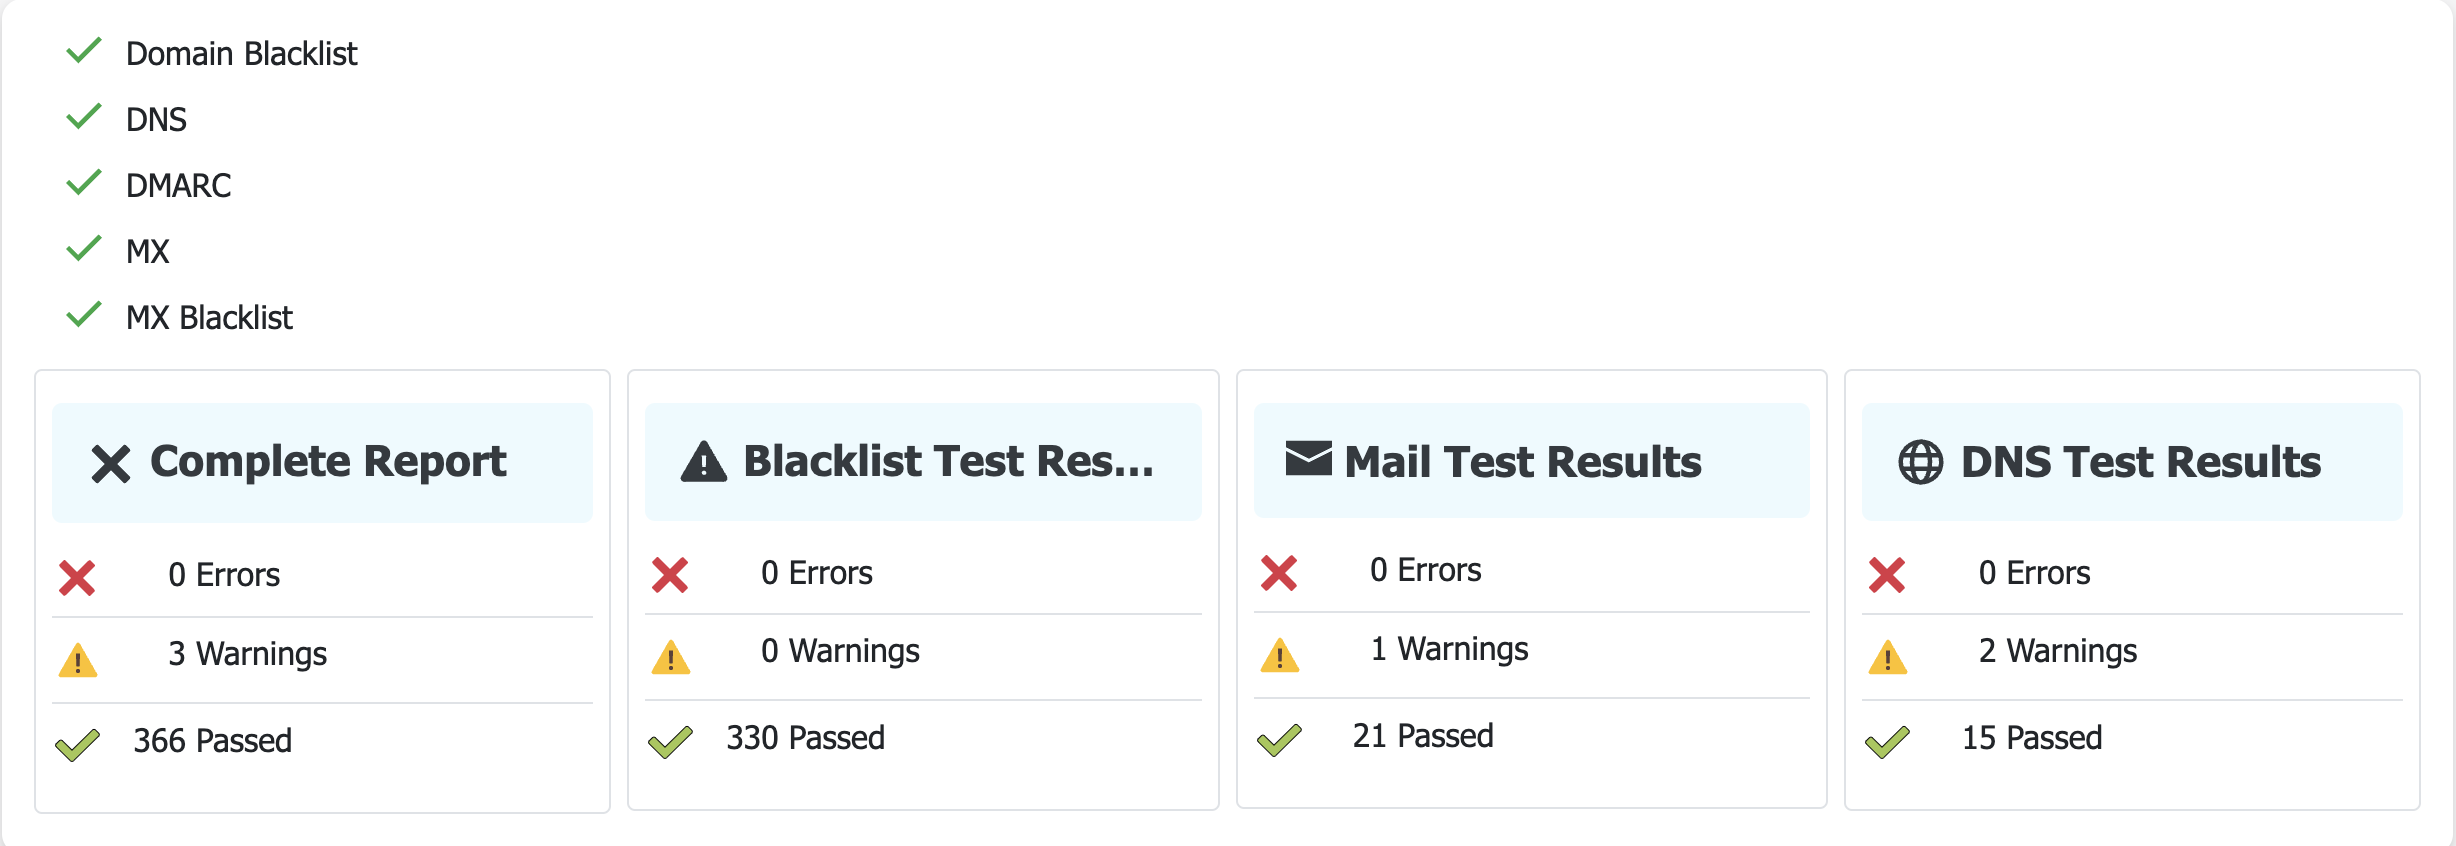
How to Check DMARC, DKIM, DNS Records and MX Blacklists
DNSChecker.org has a handy tool that checks for proper DMARC, DKIM, DNS, MX setup. It also checks to ensure your domain has not wound up on any common MX Blacklists:
Set up a Custom Tracking Domain
If you are using tracking pixels at all to track email opens or clicks, setting up a custom tracking domain will be a huge help. Tracking pixels are sometimes automatically flagged and hurt deliverability. A custom tracking domain is a secondary (or sub) domain name related to your original domain. Email outreach automation providers like Apollo.io have capabilities to set this up.
Cold Email Outreach Deliverability Checklist:
- Validate your lists and send only to verified emails
- Ensure DNS/DKIM/SFP and DNS records are setup and in order,
- Use a custom tracking domain,
- Use an email warming service like Warmforge.ai
- Slowly ramp up sending
- Monitor deliverability scores; if a domain has an issue stop all emails, send it back to warmup and wait a at least 2-3 weeks
How Many Emails Per Inbox or Domain Can I Send for Cold Outreach?
Current best practices seems to be up to 35 emails per mailbox when fully warmed up and 2-3 mailboxes per domain.
How Long Should I Keep the Email Warmup Tool Running?
Current best practice is it takes 2 weeks to warm up a new email inbox. You should keep the email warmup tool running indefinitely - do not turn it off. That brings up another question:
What is Spintax and Should I Use Spintax it for Cold Email Outreach?
You do not want to send the exact same email to a mass of people for a variety of reasons. Personalization is best at the contact and account level. Spintax is another way to vary each message and subject line. To create unique email content for each recipient, spintax allows you to provide a set of words, phrases that are interchangeable. From these words, phrases, or sentences will be 'spun' to use in the email content sent to each recipient.
How to Use Tags for Email Warmup
Most modern email warmup tools will create a unique "tag" or phrase for each inbox. What is this for? The purpose of an email tag for warmup is to set up a filter for that tag and archive those emails. This keeps the inbox uncluttered. Setting up a filter so that the email gets marked as read, skips the inbox into the archive and even labelling it as an option. Current best practice seems to warn against deleting the warm-up emails too soon after receiving them as it could counteract the positive deliverability benefits. Following this archiving process with tools like SmartLead and Instantly shouldn't hurt deliverability.
If you do all of the above, you should be able to safely get to 50 total emails/day from each email address. So with 1 sending domain and 2-4 email addresses on that domain you should be able to get to safely sending 100-200 cold emails a day from that sending domain. Want to send more? Get more sending domains and email addresses there.
Should I Use Sendgrid for Cold Email?
Using Sendgrid or another SMTP provider that sends email from servers (or dedicated IPs) is generally a bad idea for cold email and will hurt deliverability. SMTP providers like Sendgrid are not built for cold email and your emails are more likely not to end up in the inbox if you go this route. A good breakdown of the thinking behind this in Should You Use an SMPT Provider to Send Cold Emails.
How Do I Manage Multiple Email Inboxes for Cold Email?
Tools like Instantly and Apollo.io have a master inbox within their tools. This video shows How to Do a Manual Email Response in Apollo.io (i.e. one central inbox and "reply from" any mailbox. In Google Workspace, you can forward all email to one master inbox and set that up to "Reply from" the correct addresses that received the emails.
To Forward Gmail Accounts to One Inbox:
In Gmail, navigate to Settings -> See All Settings -> Forwarding and POP/IMAP -> Add a Forwarding Address. Choose one central mailbox and repeat this step for all of the other email addresses that you don't want to log into.
How to Link Multiple Gmail Accounts to Reply From Multiple Accounts A Master Inbox:
- Start in the Master or Primary Account
- Top right corner, select "Settings" Icon
- Under "Quick Settings", select "See all settings"
- Select 4th tab - "Accounts"
- In "Send Mail As:" section, select "Add another email address"
- Enter the corresponding email address name and select "Next Step"
- Click "Send Verification"
- In Settings/Accounts, for "when replying to a message" toggle on "Reply from the same address the message was sent to"
- Click on the Verify email in your second email account
- You should now be able to "send as" the secondary email address from the Primary Inbox.
- Repeat process for each secondary email address
- Don't want to do all of this? We can do it for you.
Fixing this error: "This domain name has already been used as an alias or domain"
This means the domain is linked to another account needs to be “freed up”. Here is how to fix that:
- Go to this Form within Google Admin
- Follow the instructions - enter the domain you are trying to free up. You will be prompted to include adding a CNAME or TXT record at your domain registrar to prove domain ownership. Once the changes propagate (usually within 30 mins), if you refresh the page you will see “Domain “yourdomain” is available for Signup.
- Proceed to signing up for Google Workspace
Cold Email Outreach "Done for You as a Service"
Want cold email outreach "done for you as a service" with an agency partner? Consider working with SaaSBoost.io or another B2B Sales Outsourcing firm. SaaSBoost.io can handle just the email domain setup or also incorporate this as part of a broader Apollo.io implementation for all all in one outreach solution.